SearXNG
本教程由社区贡献,不获得 Open WebUI 团队的支持。它仅作为演示,说明如何根据您的特定用例定制 Open WebUI。想要贡献?请查看贡献教程。
本指南提供了关于如何在 Docker 中使用 SearXNG 在 Open WebUI 中设置网络搜索功能的说明。
SearXNG (Docker)
"SearXNG 是一个免费的互联网元搜索引擎,它聚合了来自各种搜索服务和数据库的结果。用户既不会被跟踪,也不会被分析。"
1. SearXNG 配置
为了优化 SearXNG 以便与 Open WebUI 配合使用,请遵循以下步骤
步骤 1:git clone SearXNG Docker 并导航到该文件夹
- 创建一个新目录
searxng-docker
克隆 searxng-docker 仓库。此文件夹将包含您的 SearXNG 配置文件。有关配置说明,请参阅 SearXNG 文档。
git clone https://github.com/searxng/searxng-docker.git
导航到 searxng-docker 仓库
cd searxng-docker
步骤 2:找到并修改 .env 文件
- 从
.env文件中取消注释SEARXNG_HOSTNAME并进行相应设置
# By default listen on https://
# To change this:
# * uncomment SEARXNG_HOSTNAME, and replace <host> by the SearXNG hostname
# * uncomment LETSENCRYPT_EMAIL, and replace <email> by your email (require to create a Let's Encrypt certificate)

SEARXNG_HOSTNAME=localhost:8080/
# LETSENCRYPT_EMAIL=<email>

# Optional:
# If you run a very small or a very large instance, you might want to change the amount of used uwsgi workers and threads per worker
# More workers (= processes) means that more search requests can be handled at the same time, but it also causes more resource usage

# SEARXNG_UWSGI_WORKERS=4
# SEARXNG_UWSGI_THREADS=4
步骤 3:修改 docker-compose.yaml 文件
- 通过修改
docker-compose.yaml文件来移除localhost限制
sed -i "s/127.0.0.1:8080/0.0.0.0:8080/"
步骤 4:授予必要权限
- 通过在根目录中运行以下命令,允许容器创建新的配置文件
sudo chmod a+rwx searxng-docker/searxng
步骤 5:创建一个非限制性 limiter.toml 文件
- 创建一个非限制性
searxng-docker/searxng/limiter.toml配置文件
searxng-docker/searxng/limiter.toml
# This configuration file updates the default configuration file
# See https://github.com/searxng/searxng/blob/master/searx/botdetection/limiter.toml

[botdetection.ip_limit]
# activate link_token method in the ip_limit method
link_token = false

[botdetection.ip_lists]
block_ip = []
pass_ip = []
步骤 6:移除默认的 settings.yml 文件
- 如果存在默认的
searxng-docker/searxng/settings.yml文件,请将其删除,因为它将在 SearXNG 首次启动时重新生成
rm searxng-docker/searxng/settings.yml
步骤 7:创建一个全新的 settings.yml 文件
首次运行时,您必须从 docker-compose.yaml 文件中删除 searxng 服务的 cap_drop: - ALL,以便成功创建 /etc/searxng/uwsgi.ini。这是必要的,因为 cap_drop: - ALL 指令会移除所有功能,包括创建 uwsgi.ini 文件所需的功能。首次运行后,出于安全原因,您应该将 cap_drop: - ALL 重新添加回 docker-compose.yaml 文件中。
- 暂时启动容器以生成一个全新的 settings.yml 文件
docker compose up -d ; sleep 10 ; docker compose down
步骤 8:添加格式并更新端口号
- 将 HTML 和 JSON 格式添加到
searxng-docker/searxng/settings.yml文件中
sed -i 's/formats: \[\"html\"\/]/formats: [\"html\", \"json\"]/' searxng-docker/searxng/settings.yml
为您的 SearXNG 实例生成一个密钥
sed -i "s|ultrasecretkey|$(openssl rand -hex 32)|g" searxng-docker/searxng/settings.yml
Windows 用户可以使用以下 PowerShell 脚本生成密钥
$randomBytes = New-Object byte[] 32
(New-Object Security.Cryptography.RNGCryptoServiceProvider).GetBytes($randomBytes)
$secretKey = -join ($randomBytes | ForEach-Object { "{0:x2}" -f $_ })
(Get-Content searxng-docker/searxng/settings.yml) -replace 'ultrasecretkey', $secretKey | Set-Content searxng-docker/searxng/settings.yml
更新 server 部分中的端口号以匹配您之前设置的端口号(在本例中为 8080)
sed -i 's/port: 8080/port: 8080/' searxng-docker/searxng/settings.yml
根据需要更改 bind_address
sed -i 's/bind_address: "0.0.0.0"/bind_address: "127.0.0.1"/' searxng-docker/searxng/settings.yml
配置文件
searxng-docker/searxng/settings.yml (摘录)
默认的 settings.yml 文件包含许多引擎设置。下面是默认 settings.yml 文件可能的样子摘要
searxng-docker/searxng/settings.yml
# see https://docs.searxng.org/admin/settings/settings.html#settings-use-default-settings
use_default_settings: true

server:
  # base_url is defined in the SEARXNG_BASE_URL environment variable, see .env and docker-compose.yml
  secret_key: "ultrasecretkey"  # change this!
  limiter: true  # can be disabled for a private instance
  image_proxy: true
  port: 8080
  bind_address: "0.0.0.0"

ui:
  static_use_hash: true

search:
  safe_search: 0
  autocomplete: ""
  default_lang: ""
  formats:
    - html
    - json # json is required
  # remove format to deny access, use lower case.
  # formats: [html, csv, json, rss]
redis:
  # URL to connect redis database. Is overwritten by ${SEARXNG_REDIS_URL}.
  # https://docs.searxng.org/admin/settings/settings_redis.html#settings-redis
  url: redis://redis:6379/0
SearXNG 的 settings.yml 文件中的端口应与您 docker-compose.yml 文件中 SearXNG 的端口号匹配。
步骤 9:更新 uwsgi.ini 文件
- 确保您的
searxng-docker/searxng/uwsgi.ini文件与以下内容匹配
searxng-docker/searxng/uwsgi.ini
[uwsgi]
# Who will run the code
uid = searxng
gid = searxng

# Number of workers (usually CPU count)
# default value: %k (= number of CPU core, see Dockerfile)
workers = %k

# Number of threads per worker
# default value: 4 (see Dockerfile)
threads = 4

# The right granted on the created socket
chmod-socket = 666

# Plugin to use and interpreter config
single-interpreter = true
master = true
plugin = python3
lazy-apps = true
enable-threads = 4

# Module to import
module = searx.webapp

# Virtualenv and python path
pythonpath = /usr/local/searxng/
chdir = /usr/local/searxng/searx/

# automatically set processes name to something meaningful
auto-procname = true

# Disable request logging for privacy
disable-logging = true
log-5xx = true

# Set the max size of a request (request-body excluded)
buffer-size = 8192

# No keep alive
# See https://github.com/searx/searx-docker/issues/24
add-header = Connection: close

# uwsgi serves the static files
static-map = /static=/usr/local/searxng/searx/static
# expires set to one day
static-expires = /* 86400
static-gzip-all = True
offload-threads = 4
2. 替代设置
或者,如果您不想修改默认配置,您可以简单地创建一个空的 searxng-docker 文件夹,然后按照其余的设置说明进行操作。
Docker Compose 设置
将以下环境变量添加到您的 Open WebUI docker-compose.yaml 文件中
services:
  open-webui:
    environment:
      ENABLE_RAG_WEB_SEARCH: True
      RAG_WEB_SEARCH_ENGINE: "searxng"
      RAG_WEB_SEARCH_RESULT_COUNT: 3
      RAG_WEB_SEARCH_CONCURRENT_REQUESTS: 10
      SEARXNG_QUERY_URL: "http://searxng:8080/search?q=<query>"
为 SearXNG 创建一个 .env 文件
# SearXNG
SEARXNG_HOSTNAME=localhost:8080/
接下来,将以下内容添加到 SearXNG 的 docker-compose.yaml 文件中
services:
  searxng:
    container_name: searxng
    image: searxng/searxng:latest
    ports:
      - "8080:8080"
    volumes:
      - ./searxng:/etc/searxng:rw
    env_file:
      - .env
    restart: unless-stopped
    cap_drop:
      - ALL
    cap_add:
      - CHOWN
      - SETGID
      - SETUID
      - DAC_OVERRIDE
    logging:
      driver: "json-file"
      options:
        max-size: "1m"
        max-file: "1"
您的堆栈已准备好使用以下命令启动
docker compose up -d
首次运行时,您必须从 docker-compose.yaml 文件中删除 searxng 服务的 cap_drop: - ALL,以便成功创建 /etc/searxng/uwsgi.ini。这是必要的,因为 cap_drop: - ALL 指令会移除所有功能,包括创建 uwsgi.ini 文件所需的功能。首次运行后,出于安全原因,您应该将 cap_drop: - ALL 重新添加回 docker-compose.yaml 文件中。
或者,您可以使用 docker run 直接运行 SearXNG
docker run --name searxng --env-file .env -v ./searxng:/etc/searxng:rw -p 8080:8080 --restart unless-stopped --cap-drop ALL --cap-add CHOWN --cap-add SETGID --cap-add SETUID --cap-add DAC_OVERRIDE --log-driver json-file --log-opt max-size=1m --log-opt max-file=1 searxng/searxng:latest
3. 确认连接
在命令行界面中,从您的 Open WebUI 容器实例确认与 SearXNG 的连接
docker exec -it open-webui curl http://host.docker.internal:8080/search?q=this+is+a+test+query&format=json
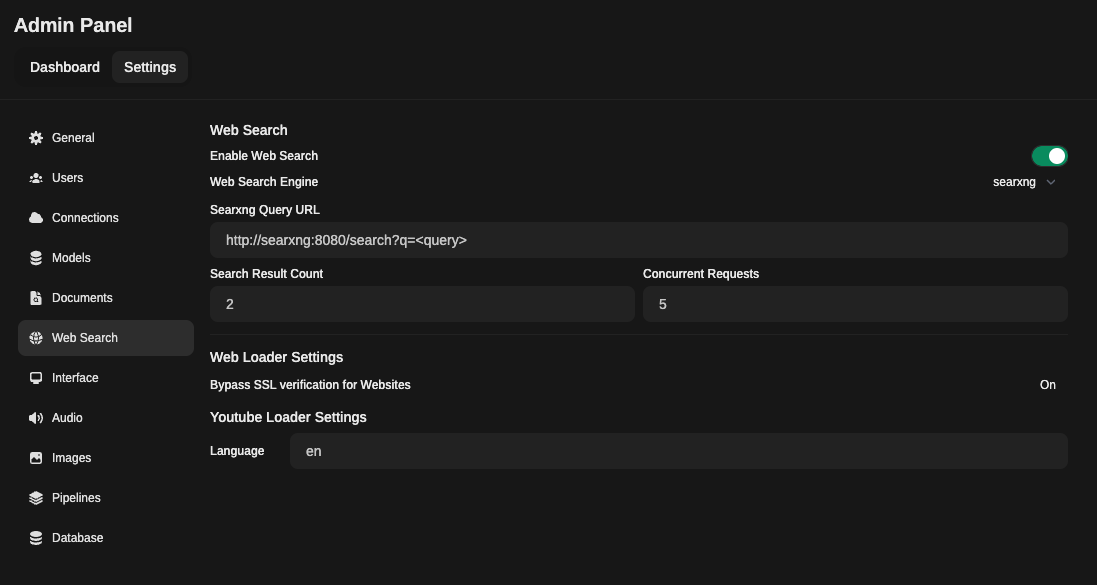
4. GUI 配置
- 导航到:
管理面板->设置->网络搜索 - 切换
启用网络搜索 - 从下拉菜单将
网络搜索引擎设置为searxng - 将
Searxng 查询 URL设置为以下示例之一
http://searxng:8080/search?q=<query>(使用容器名称和暴露的端口,适用于基于 Docker 的设置)http://host.docker.internal:8080/search?q=<query>(使用host.docker.internalDNS 名称和主机端口,适用于基于 Docker 的设置)http://<searxng.local>/search?q=<query>(使用本地域名,适用于本地网络访问)https://<search.domain.com>/search?q=<query>(使用自定义域名用于自托管 SearXNG 实例,适用于公共或私人访问)
请注意,/search?q=<query> 部分是强制性的。
- 相应调整
搜索结果计数和并发请求值 - 保存更改
5. 在聊天中使用网络搜索
要访问网络搜索,请点击消息输入字段旁边的 + 号。
您可以在此处切换网络搜索的开启/关闭。

通过遵循这些步骤,您将成功地在 Open WebUI 中设置了 SearXNG,从而能够使用 SearXNG 引擎执行网络搜索。
注意
您需要在聊天中明确地开启/关闭此功能。
此功能是按会话启用的,例如,重新加载页面、切换到另一个聊天会将其关闭。